Using arts and crafts in EFL/ESL offers a break from book work while allowing students to show their creativity and dexterity. Plus, it’s great fun.
But not all arts and crafts lessons actually help with learning English. It’s easy to get distracted by the practical aspects of the session and end up forgetting to focus on the language.
That’s why I’ve written this article. The aim is to help you give the best EFL/ESL arts and crafts classes while still maintaining a high level of English instruction. Also, at the end of the article, I’ll share seven easy activities which I’ve used in my own teaching with great success.
How to use arts and crafts in EFL/ESL – Intention
When planning an arts and crafts lesson for EFL/ESL, intention is key. What do you intend to teach? Vocabulary? Asking questions? Giving instructions? What English skills will the students develop in the class?
This doesn’t have to be particularly sophisticated. Here are some simple examples.
- Learning action verbs which apply to the activity (cut, stick, fold, crease, etc.) or words for the materials themselves (card, glitter, etc.)
- Use the creation as a place to write vocab you’ve been practicing. If you make a model city, you can practice the words for different shops.
- Practice listening. Either through a video or teacher explanation, students follow a series of steps in order to make the creation.
- With some groups, usually those who are a little more advanced, you can use an arts and crafts activity as part of a conversation lesson, giving students something to do with their hands while chatting about whatever you want.
It doesn’t really matter what the intention is, as long as you have one. It gives the class direction and purpose. If your students come out of the class having made something, that’s great, but you want them to be able to identify what they’ve learned in English, too.
Practical tips for arts and crafts in EFL/ESL
Before we start focusing on specific activities, I’ll quickly share some practical tips which I’ve learned from my years of successful (and occasionally unsuccessful) arts and crafts activities.
- Bring extra materials and equipment. If you have a class of 25 kids, bring enough materials for 30. There will be some who mess up and need replacements. Also, if you’re relying on students bringing their own pens/glue/scissors, bring a few for those inevitable few who didn’t bring the right stuff.
- Keep instructions slow and simple. When explaining yourself, go step by step, making sure everyone keeps up. With a video, pause frequently.
- Build in time to help slower students. Some people have a natural way with arts and crafts and get it done immediately. Others need more time. Make sure you prepare some time in the class to go around and assist those who are struggling.
- Plan extension activities. While you’re helping those who need it, the ones who have finished will get bored. Make sure there’s a “next level” version of the activity for them to do.
- Consider the mess. Never underestimate the ability of children to make a mess. If paint and glue are involved, use aprons and cover tables in newspaper.
- Finish with enough time to tidy up. Usually I’d recommend ten minutes for tidying up, especially if there’s a lot of paper cutting or tables that need wiping. It’s better to finish early that run long. (If you do finish early, bust out one of my favourite 5 Minute Games Every Teacher Needs to Know)
- Prepare tidying jobs and assign them efficiently. When it comes to tidying up, it’s easy for kids to mill around doing nothing. Plan what things will need doing and give everyone a specific task to complete.
How to choose a great arts and crafts activity for EFL/ESL
There are two ways to choose a great arts and crafts activity for your class. First, is to establish your intention, then search for an activity which allows you to achieve what you need. Second, choose an activity you know your class will like, and then think of the intention.
The benefit of deciding your intention first is that you can meet specific targets or goals related to the rest of your curriculum. However, finding activities that meet the exact requirements is tough.
Choosing the activity first gives you much more flexibility. But in return, you have less control over what kind of thing you teach your students.
Whichever way you choose, consider these points when selecting an activity:
- Is it the right challenge level for my students in terms of dexterity and complexity?
- What are the possibilities for practicing English?
- Is the English required for the activity at a suitable level?
- How long will the activity take?
- What materials and equipment are required, and do I have access to them all?
Here’s an example of a bad arts and crafts activity for a class of 25 eight-year-olds with a beginner level of English:
EGGSHELL MOSAICS (bad choice of activity)
Use the broken peeled shell of hard-boiled eggs to create a colourful mosaic picture. Instruction video below.
Yes, the final product looks fantastic. But there are so many problems with this activity given the needs of the class. Let’s look at the five points we considered above:
- Right challenge for dexterity and complexity? No. It’s way too hard to peel the eggs, remove the membrane, glue it all down and paint it nicely.
- Possibilities for practicing English? Some. There are some instructions to follow which make for a bit of listening, but the fact you can learn how to do it by watching a video with no spoken words tells you how limiting this is.
- English at a suitable level? No. The vocabulary in the instructions is a little challenging. You could probably pre-teach it, but how relevant is it going to be for an eight-year-old?
- How long will it take? 1-2 hours. Even if you prepare the eggshells yourself, sticking them down and painting will take quite a long time. Quite a lot of this will be without learning any English.
- Materials and equipment? Quite a lot. You need to get hard-boiled eggs, cardboard, sharpies for all students, strong glue, and marker pens/watercolour paints. For a whole class, that’s quite a lot.
Not to mention the mess your students will make.
As an arts and crafts activity, this isn’t the worst I’ve ever seen. In fact, I quite like it. But in an English class, I think it’s a poor choice.
Now, you’re probably hoping I’ll give you an example of a good arts and crafts activity for EFL/ESL, and, yes, I will. In fact, I’ll give you seven. With this first one, I’ll explain why it works, referring to the five consideration points we discussed before.
1. Paper chain messages
Connect letters, words and images in a beautiful long chain.
Here’s a video on some ideas you can do with paper chains and below I’ve given some of my own which are specific to EFL/ESL.
- Write a single letter on each chain link, joining them together to spell a word.
- Write a word on each chain link and colour code it. For example, pronouns are written on blue, verbs on red, adjectives on green, etc.
- Counting: write the numeral and the full word for numbers in a sequence – see how high you can count by making the longest chain.
- Vocab categories – make a big chain with all the words you know in a category, for example, sports.
Now how does this stack up against our five considerations? Remember, we’re looking for an activity for a group of 25 eight-year-olds.
- Right challenge for dexterity and complexity? Yes. Children this age are able to cut strips of paper and stick them together.
- Possibilities for practicing English? Plenty. There are various options you can choose: spelling, sentence structure, vocabulary, counting, and more.
- English at a suitable level? Yes. The instructions are easy to understand, and you can adapt what you do with the chains to the level of your students.
- How long will it take? 30-45 minutes. What I like about this activity is you can do it in a short time by creating small chains, but you can also spend longer on it because kids love creating more, bigger chains.
- Materials and equipment? Cheap and available. You need pens, scissors, glue and quite a lot of paper (coloured paper is ideal). You can print pre-made chain links, but it’s not required.
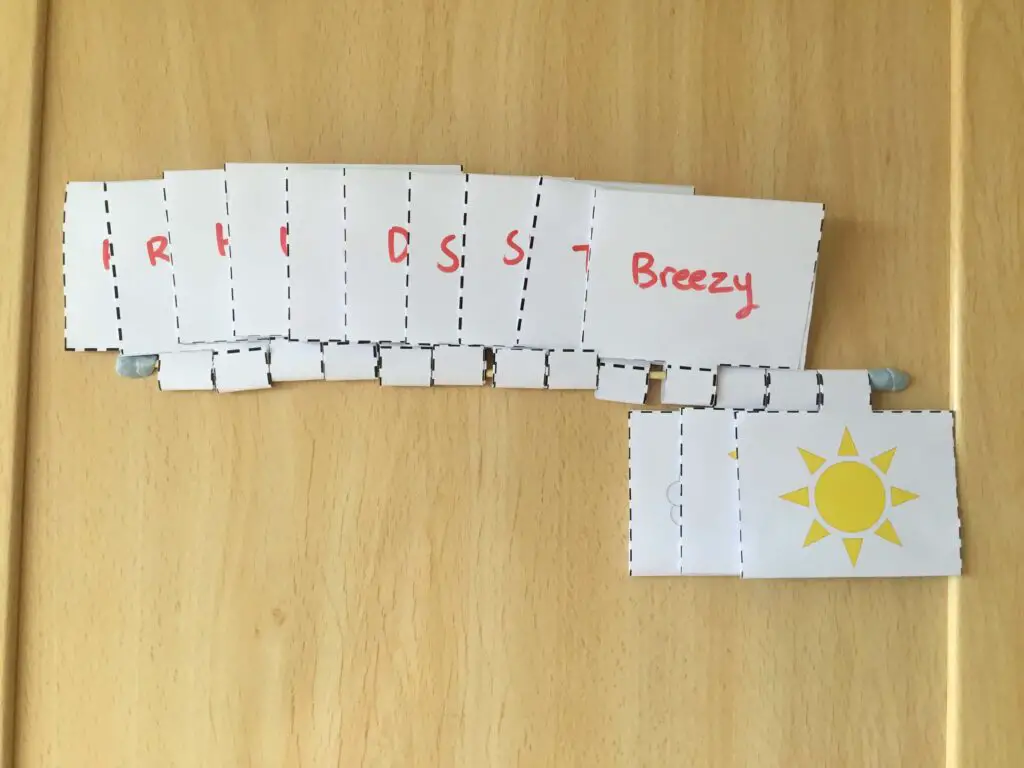
2. Vocab rods
One of my own inventions, vocab rods provide a great way to learn and review vocabulary with a built in flashcard system. If you make them with a big class, you can place them all around the classroom.
Difficulty: 3/5
Time: 30-60 minutes
Mess level: 3/5
For this activity, each student will need:
- A wooden rod (no more than 1/4 inch in diameter)
- Paper (printed templates work best)
- Scissors
- Glue
- Sticky tape or blu tack
- Marker pen
- Printed images or coloured pens for drawing
The trickiest part of this activity is cutting out the correct paper shape. That’s why I’ve made these templates for you to print – using them makes it a lot easier for your students.
INSTRUCTIONS
- Print templates so you have about 12 for each rod (assuming the rod is 30 centimetres or 12 inches).
- Cut out the templates.
- Fold a template in half, using the grey line in the centre as a guide.
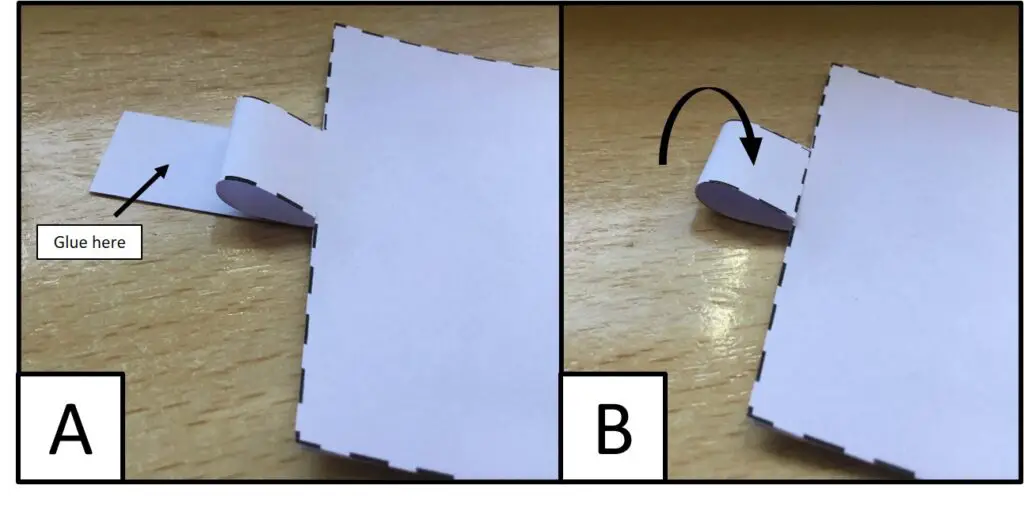
- Glue the main body together, but don’t glue the tabs at the end.
- Fold one tab in half inwards, so it creates a small loop (see picture A below). Don’t crease.
- Glue the top half of the other tab and fold it over so it sticks over the first tab (see picture B below).
- Write a word or phrase on one side.
- Draw a picture (or paste a printed picture) on the other side.
- Thread the wooden rod through the loop.
- Repeat steps 3-9 until the rod is nearly full. Leave at least half an inch (1 cm) at each end.
- Use blu tack or sticky tape to firmly stick the ends of the rod to a wall.
- Flip the bits of paper up and down to reveal the picture and the word. You’re done!
You can stick these up around the class to give constant opportunities for students to practice their vocab. If everyone makes rods with different words, you can build a big collection!
Just make sure to affix the rods to the wall firmly, otherwise they’ll constantly be falling down.
3. Model city
This is a fun way of practicing the names of places in a city, as well as giving you a great platform to teach how to give directions.
Difficulty: 4/5
Time: 3-4 hours
Mess level: 4/5
Of all the activities on this list, this is the most demanding in terms of materials, equipment, time and difficulty. It’s best done in small groups (3-4) to share the workload and save on space and materials. You’ll need (per group):
- A large piece of cardboard – 50 x 50 centimetres (20 x 20 inches).
- Coloured poster paint (mostly black and white for roads, green for grass)
- Small empty cartons and boxes (make sure they’re cleaned out before using!)
- Paper
- Scissors
- Marker pens
- Pencils
- Glue or blu tack/tape
- Optional extras (pom-poms, plastic trees, mini-road signs, etc.)
The instructions are relatively simple:
First, sketch an outline of the plan of the town. Draw roads and spaces for buildings. You may want to include a park, a river, a playground, etc.
Paint the areas the appropriate colour – black and white for roads, green for the building areas and parks
Paint and decorate the cartons/boxes so they look like different buildings. Alternatively, you can wrap the cartons/boxes in paper and decorate them instead of painting. Glue the buildings down, or just use some blu tack or tape if you don’t want to fix them permanently.
Here’s a video (in Spanish) which shows roughly what it could look like. It’s not exactly how I do it, but it’s close enough. Personally, I’d make the road network a little more complex to allow for more challenge when giving directions later.
The opportunities for English come in naming the buildings, and also exploring what things you might find in each one, for example, pastries in the bakery, politicians in the city hall.
Subsequently, you can do plenty of activities about giving directions with your model city.
4. Fortune Teller
From the big, complex model city to something much easier and familiar – it’s the famous fortune teller (or cootie eater, comecocos, salt cellar or paku paku).
Difficulty: 2/5
Time: 15-30 minutes
Mess level: 1/5
Once your students get the knack of making these, they won’t stop. All you need is some A4 paper, scissors and something to write with. Here’s a video which you can use in class. Pause it frequently and give instructions in English as you go along.
Once you’ve done that, you can write on different parts of the fortune teller. This is a great way to practice some English.
The standard way to do it is by writing numbers on the outside (1-4) and on the inside (5-8), but you can write full words, colours, sports, animals… whatever vocab you want to practice.
Then on the inside, under the flaps, students can write fortunes. Provide some example fortunes for those who struggle to think of their own.
5. Emoji bookmarks
A quick, fun activity which practices following instructions and allows some practice of parts of the face and emotions. The bookmarks are so quick to make, each student can create a whole range.
Difficulty: 2/5
Time: 15-30 minutes
Mess level: 2/5
This is a great video for practicing listening, as if you don’t follow the instructions when cutting the circular edges, the bookmark will fall apart!
If you think that part might be too tricky for your students, you can always skip cutting the circles and just have straight edges for your emojis.
English to focus on:
- Facial features: eye, eyebrow, eyelash, tongue, teeth, tears, etc.
- Emotions: happy, laughing, angry, cheeky, sad, etc.
6. Snowflakes
A seasonal favourite, making snowflakes is enough of a challenge for kids 8 and above, and can create some fantastic results.
Difficulty: 3/5
Time: 15-30 minutes
Mess level: 3/5
I think I bust this activity out every single year as a “last day of term” session right before the holiday period. If it has one flaw, it’s that you can’t really focus on much English other than listening to instructions.
This is a nice video because you can see how to make a few different styles of snowflake.
WARNING: At the end of the activity, there will be thousands of tiny bits of paper all over the floor. When you have a smooth surface, it’s pretty easy to sweep all this up, but on carpet it’s not so fun. Encourage kids to think about where they’re dropping the excess scraps.
7. Paper airplanes
I love this activity. I’m yet to find a single student who doesn’t enjoy making and, more importantly, launching paper airplanes.
Difficulty: 2/5
Time: 10-20 minutes
Mess level: 1/5
It’s surprisingly creative as, although there are instructions on how to make paper airplanes, there are so many things you can tweak and modify in the hunt for the best flight.
Here’s a video which explains how to make a basic model first, then goes into the physics of how they fly.
Most of the time I turn it into a mini-science experiment in which pairs/teams of students try to figure out how to make their airplanes fly better, adjusting, testing and redesigning. If you have a sports hall available (or a playground on a non-windy day), why not see who can get theirs to fly the furthest?
It’s not an activity for explicitly teaching vocab or grammar, but for a group capable of basic conversation, you can really focus on the language used for collaborating and problem solving.
Get creative
The joy of using arts and crafts in English is the different approaches and perspectives you uncover with your students. Often, those who aren’t as attentive in class come alive in these activities.
In theory, you can adapt any arts and crafts activity to the English classroom, as long as you ensure you’re doing them with some learning intention. That’s where the real creativity comes in. Can you design an activity to really progress your students while still providing them with an exciting project?
If you can, you’re doing it right!
If you’re looking for more games and activities, check out my other lists:
9 EFL/ESL Speaking Games & Activities Perfect for Beginners
9 EFL/ESL Games & Activities for Intermediate Learners
9 EFL/ESL Games and Activities for Advanced Learners
9 High Energy EFL/ESL Games for Boosting Vocabulary
9 Engaging Homework Ideas for EFL/ESL: No worksheets!
9 Exciting EFL/ESL Activities for Writing & Spelling
9 Fun EFL/ESL Games & Ideas With Standard Playing Cards
9 EFL/ESL Games With No Materials or Preparation Needed
9 EFL/ESL 5 Minute Games Every Teacher Needs to Know
9 Superb EFL/ESL Games & Activities Using Just Pen & Paper
9 Classy EFL/ESL Games & Activities for Adults (+ tips)
9 Confidence-Boosting EFL/ESL Speaking Games for All Levels
9 Exciting Flashcard Games for EFL/ESL Classes